
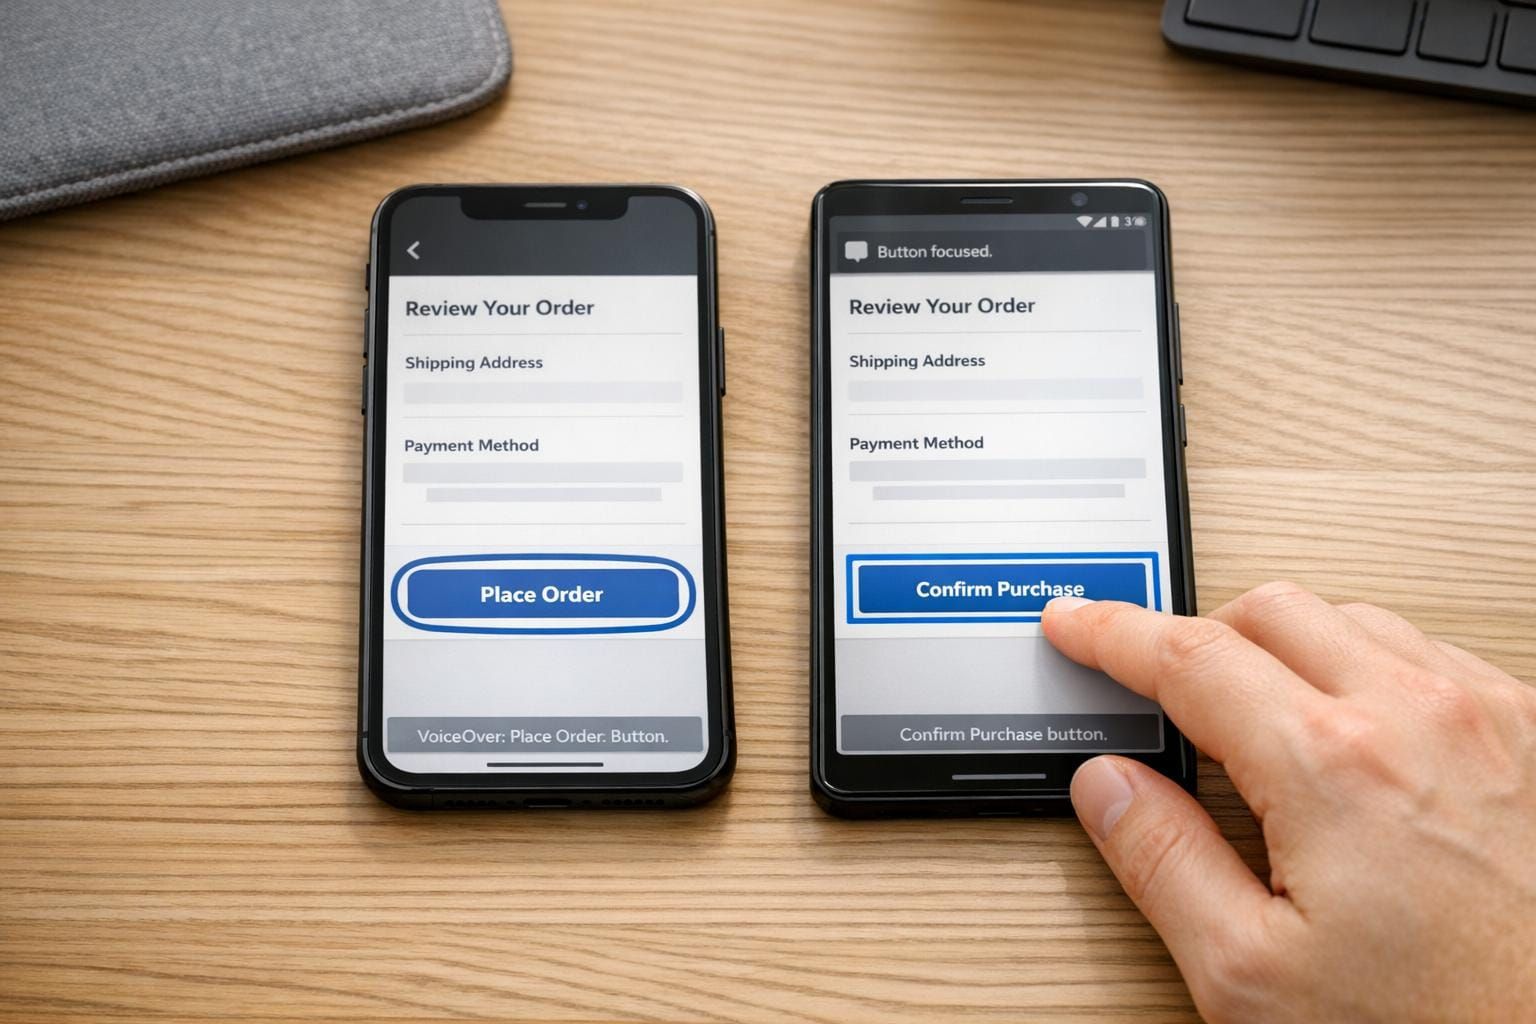
How to Test Screen Reader Compatibility on Mobile
Manual VoiceOver and TalkBack tests on real devices; prioritize critical flows, test dynamic updates, and follow WCAG AA.
- Why it matters: Over 1.3 billion people globally live with disabilities. In 2024, 8,800 ADA lawsuits were filed over digital accessibility, many targeting small businesses.
- Key tools: Test with VoiceOver (iOS) and TalkBack (Android) since they work differently. VoiceOver uses gestures like the Rotor, while TalkBack has Reading Controls.
- What to test: Focus on critical user flows like sign-ins, forms, and dynamic elements (e.g., error messages). Ensure compliance with WCAG 2.1/2.2 Level AA standards.
- Setup tips: Use real devices, reset to default settings, and record sessions for clarity. Enable features like "Screen Curtain" (iOS) or "Display Speech Output" (Android) to simulate user experiences.
- Manual testing matters: Automated tools miss 60-80% of accessibility issues. Check logical navigation, clear labels, and proper announcements for dynamic content.
- Fix issues early: Label elements correctly, ensure proper focus, and align fixes with WCAG guidelines. Regular testing prevents costly accessibility debt.
Quick Comparison:
| Feature | VoiceOver (iOS) | TalkBack (Android) |
|---|---|---|
| Activation | Triple-click Side/Home button | Hold both volume keys |
| Navigation Tool | Rotor (two-finger rotate) | Reading Controls (swipe) |
| Dynamic Updates API | .announcement |
accessibilityLiveRegion |
| Scroll Gesture | Three-finger swipe | Two-finger swipe |
Testing accessibility isn't optional. Combining manual testing, real devices, and platform-specific fixes ensures your app works for everyone.
Preparing for Screen Reader Testing on Mobile
Getting ready for effective screen reader testing requires careful planning. The steps you take early on - like defining what to test, choosing devices, and deciding how to document results - play a big role in how useful your findings will be.
Define the Test Scope
Start by pinpointing your app's "Red Routes" - those critical user journeys that are essential for functionality. These include tasks like signing in, searching, checking out, and managing core settings. If these flows fail, the app becomes unusable. Pay special attention to areas like multi-factor authentication (MFA) codes, form validation, and visual-only feedback, as these are common trouble spots for screen readers.
Testing should cover both iOS and Android platforms. The way gestures and APIs work differs significantly between the two, so testing only one won't guarantee accessibility on the other. Aim for compliance with WCAG 2.1 or 2.2 Level AA, which is the standard for accessibility in the United States. Don't forget to include dynamic elements like loading indicators, toast messages, and error prompts in your scope.
"Mobile accessibility is not a feature you add at the end - it's a quality attribute you test throughout. Every sprint without accessibility testing creates debt that's exponentially harder to fix later." - Yuri Kan, Senior QA Lead
Set Up Testing Devices
Always use real devices for testing. Simulators and emulators can't fully replicate how screen readers behave, especially when it comes to gesture timing and audio feedback. Include at least one newer device with the latest operating system and one older model to catch issues across screen sizes and API versions.
Before each session, reset devices to their default settings - standard text size, unlocked orientation, and no pre-enabled accessibility features. Test one assistive technology at a time to keep results clear and easy to interpret. Set up the Accessibility Shortcut on each device for quick toggling. On iOS, triple-click the Side or Home button to enable VoiceOver. On Android, hold both volume keys for three seconds to activate TalkBack.
| Feature | VoiceOver (iOS) | TalkBack (Android) |
|---|---|---|
| Activation Path | Settings > Accessibility > VoiceOver | Settings > Accessibility > TalkBack |
| Quick Toggle | Triple-click Side/Home button | Hold both volume keys for 3 seconds |
| Visual Debugging Tool | Screen Curtain (hides display) | Display speech output (text captions) |
| Pre-check Tool | Xcode Accessibility Inspector | Accessibility Scanner app |
Prepare the Testing Environment
Use dedicated test accounts filled with sample data to cover a variety of app states, such as empty screens, error messages, successful actions, and dynamic updates. This ensures you can test edge cases and avoid guesswork.
Connect your device to a computer and record every testing session - both screen and audio. This creates a detailed reference for developers and helps eliminate confusion when logging issues. On Android, enable "Display speech output" in TalkBack's developer settings to show text captions of what the screen reader announces. This is especially helpful when audio playback isn't practical. On iOS, activate Screen Curtain to turn off the display entirely, simulating the experience of someone relying solely on audio feedback.
With a well-defined scope, properly set up devices, and a controlled testing environment, you're ready to conduct thorough, effective screen reader tests.
sbb-itb-124fdbf
Testing Mobile Apps with VoiceOver (iOS)
VoiceOver is the most widely used mobile screen reader, with around 71% of mobile screen reader users relying on it. This makes thorough testing with VoiceOver a critical step in ensuring accessibility.
Basic Navigation and Testing Setup
Start by enabling VoiceOver on your device. You can do this through Settings > Accessibility > VoiceOver, or simply ask Siri to turn it on. To get comfortable with the gestures, use the VoiceOver Practice area. This offers a controlled environment to rehearse and familiarize yourself with key actions.
Next, set up the Rotor, a tool that allows you to quickly navigate by specific element types like headings, links, landmarks, or form controls. You can configure this under Settings > Accessibility > VoiceOver > Rotor. Activate the Rotor with a two-finger rotating gesture, and it’ll save you from swiping endlessly through unrelated elements. For consistency in testing, set your device locale to United States (English) so that speech output, date formats (MM/DD/YYYY), and currency ($) remain standardized.
Here’s a quick reference for common VoiceOver gestures:
| Action | Gesture |
|---|---|
| Select/Read Item | Single tap |
| Activate Item | Double tap |
| Next/Previous Element | Swipe right / Swipe left |
| Scroll | Three-finger swipe up/down |
| Open Rotor | Two-finger rotate |
| Read from Top | Two-finger swipe up |
| Toggle Screen Curtain | Three-finger triple tap |
Testing Content and Controls
Navigate through key screens by swiping right. The focus should follow a logical top-to-bottom, left-to-right order, mirroring what sighted users experience. If elements are announced out of sequence, it’s a bug that needs immediate attention.
For every interactive element - like buttons, links, and form fields - VoiceOver should clearly announce three details: Name, Role, and State (e.g., "selected" or "dimmed"). If a button announces "image" or nothing at all, it’s likely missing an accessibilityLabel. Informative images should have descriptive labels, while decorative images should be hidden from VoiceOver using isAccessibilityElement = false.
"Screen readers are the primary way many users navigate mobile apps. Running VoiceOver... exposes issues that automated audits may miss." - Perfecto
Automated tools only catch about 20% to 40% of WCAG violations. This is why manual VoiceOver testing is indispensable. Also, check that all touch targets meet the minimum size of 44×44 points. Smaller elements can be frustratingly difficult to activate, especially for users with motor impairments.
Finally, test how the app handles dynamic content and notifications, as these are common areas where accessibility breaks down.
Handling Dynamic Content and Notifications
Dynamic content often trips up apps. For example, after submitting a form, VoiceOver should audibly announce validation errors or success messages.
iOS provides notification APIs to address this. Use UIAccessibility.post(notification: .announcement, argument: "Message") for things like toast messages or inline errors. When opening a modal, use UIAccessibility.post(notification: .screenChanged, argument: firstElement) to ensure VoiceOver’s focus moves directly into the new content. Additionally, set accessibilityViewIsModal = true for modals. This traps focus within the dialog, preventing users from accidentally swiping into background content they can’t interact with.
Here’s a breakdown of key notification APIs:
| Notification Type | iOS API | Purpose |
|---|---|---|
| General Announcement | .announcement |
Toast messages, validation errors, status updates |
| Screen Change | .screenChanged |
Focuses on new content like a modal or page |
| Layout Change | .layoutChanged |
For partial screen updates without a full page change |
| Escape Action | accessibilityPerformEscape |
Dismisses modals using a two-finger Z-scrub gesture |
To ensure everything works as intended, enable Screen Curtain during testing. This disables the screen display, forcing you to rely solely on audio feedback. If you can navigate the entire app flow, catch all errors, and dismiss modals without visual assistance, your dynamic content handling is in good shape.
Testing Mobile Apps with TalkBack (Android)
After completing VoiceOver testing for iOS, it's equally important to ensure accessibility on Android devices by testing with TalkBack.
TalkBack is Android's built-in screen reader and accounts for 34.7% of mobile screen reader usage. Despite its widespread use, a 2022 survey revealed that 77% of Android developers don't use any tools to verify accessibility. This gap highlights why TalkBack testing is crucial.
Basic Navigation and Testing Setup
To activate TalkBack, go to Settings > Accessibility and toggle it on. For quicker access, enable the Volume Key Shortcut (hold both volume keys for 3 seconds). If needed, install the Android Accessibility Suite.
Enable Display Speech Output under TalkBack's Advanced > Developer settings and set the log level to VERBOSE. Also, make sure the device locale is set to U.S. English.
Here’s a quick guide to TalkBack gestures:
| Action | TalkBack Gesture |
|---|---|
| Move to next element | Swipe right |
| Move to previous element | Swipe left |
| Activate selected item | Double-tap |
| Open TalkBack Menu | Three-finger tap or swipe down then right |
| Open Local Context Menu | Swipe up then right |
| Scroll | Two-finger swipe |
| Navigate back or dismiss | Swipe down then left |
| Cycle Reading Controls | Swipe up then down |
| Stop speech | Two-finger tap |
Instead of VoiceOver's Rotor, TalkBack uses Reading Controls. By swiping up then down, you can navigate modes like headings, links, and landmarks. Customize these options under Settings > TalkBack > Customize Menus.
Testing Content and Controls
With TalkBack, every element should announce its Name, Role, and State. Ensure that focus moves logically - top-to-bottom and left-to-right - across the screen. If focus skips around, such as jumping from a header to the footer, check the view hierarchy for issues.
For example, a checkbox should be announced as "Subscribe to newsletter, checkbox, unchecked" instead of just "checkbox." Pay close attention to Floating Action Buttons (FABs); a 2020 University of Washington study found that 93% of FABs lacked content descriptions, making them inaccessible for TalkBack users.
Also, verify content grouping. For instance, a product card with an image, title, and price should be treated as one focusable element so TalkBack reads it as a single announcement. This prevents users from having to navigate through each sub-element. Similarly, ensure form fields are labeled correctly - users should hear "Email, edit box" rather than "Edit box, blank."
Dynamic Content and Updates
Dynamic events like form submissions, spinners, toast messages, and error notifications must provide immediate feedback through TalkBack. If announcements are delayed or missing, it signals an accessibility problem.
To handle dynamic content, Android offers two key tools:
- Use the
accessibilityLiveRegionattribute for views that update dynamically. Set it to POLITE so TalkBack waits for a pause before announcing, or ASSERTIVE for critical updates that need immediate attention. Use the assertive option sparingly to avoid overwhelming users. - For one-time events like toast messages, use
announceForAccessibility("text")to trigger custom announcements.
When a modal window appears, programmatically move TalkBack focus to the new content using setAccessibilityFocus(node). Also, ensure that focus remains confined within the modal until it's dismissed.
A 2025 study by ArcTouch and Fable found that 72% of user journeys in 50 popular iOS and Android apps had accessibility barriers. Poor handling of dynamic content was a major factor, emphasizing the importance of manual testing for these scenarios. Following these steps ensures a thorough approach to TalkBack testing and enhances mobile screen reader compatibility.
Integrating Screen Reader Testing into UX Workflows
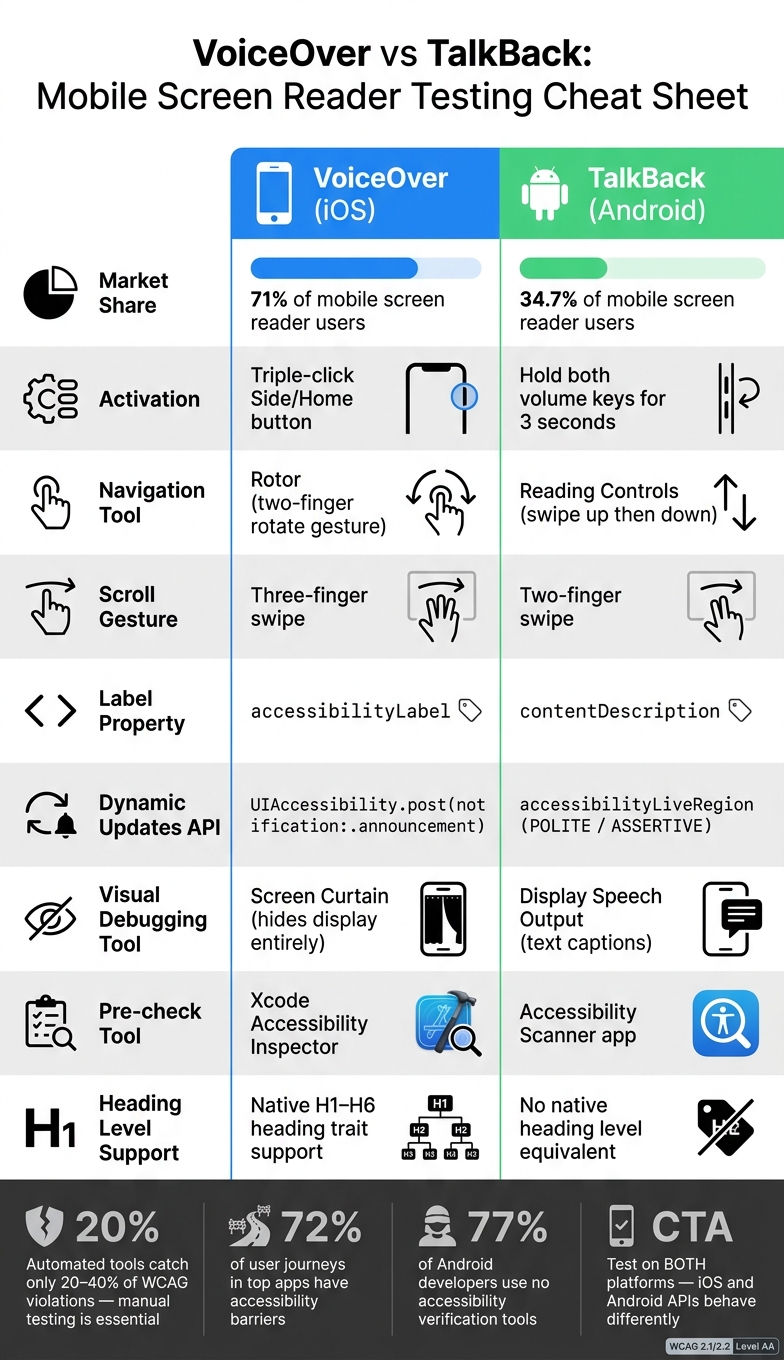
VoiceOver vs TalkBack: Mobile Screen Reader Testing Cheat Sheet
After conducting thorough VoiceOver and TalkBack tests, the next step is weaving accessibility into your UX workflows. This ensures that the insights gained from testing lead to meaningful improvements and that accessibility remains a focus throughout the development process.
Prioritizing and Fixing Accessibility Issues
Not all accessibility issues are created equal. Start by categorizing them based on severity - Critical, High, Medium, or Low - depending on their impact on users. For instance, a missing "Submit" button label is a critical issue, while a confusing reading order might rank as low.
Every issue should align with a WCAG criterion to provide developers with clear technical guidance and support legal compliance. For example:
- An unlabeled icon button violates WCAG 1.1.1 (Non-text Content).
- A modal that fails to trap focus violates WCAG 2.1.2 (No Keyboard Trap).
Including a short screen recording with each issue can make the problem clearer than text descriptions alone. This visual aid helps developers understand the exact issue and its impact.
To ensure accessibility is part of the development process, include specific accessibility acceptance criteria in your tickets as part of the Definition of Done. For example, a ticket for a form validation might include: "When a validation error appears, VoiceOver must announce the error text, and focus must shift to the first invalid field." Treat critical accessibility issues as blockers, similar to app crashes - no deployment should proceed until they’re fixed.
Comparing VoiceOver and TalkBack Results
Features often behave differently across iOS and Android, so document findings separately for each platform. Address platform-specific fixes in detail - for instance, iOS relies on UIAccessibility properties, while Android uses contentDescription. A vague instruction like "add a label" can lead to wasted development time without this clarity.
Here’s a quick comparison of key differences between VoiceOver and TalkBack:
| Feature | iOS (VoiceOver) | Android (TalkBack) |
|---|---|---|
| Label Property | accessibilityLabel |
contentDescription |
| State Property | accessibilityTraits / accessibilityValue |
AccessibilityNodeInfoCompat |
| Dynamic Updates | UIAccessibility.post(notification: .announcement) |
accessibilityLiveRegion (Polite/Assertive) |
| Navigation Tool | Rotor (two-finger twist) | TalkBack Menu / Reading Controls |
| Scroll Gesture | Three-finger swipe | Two-finger swipe |
One key distinction: Android doesn’t natively support heading levels (H1–H6) like iOS does. For example, iOS’s "Header" trait has no direct counterpart on Android. Be sure to document these differences so designers and developers understand why fixes on one platform may not translate directly to the other.
By addressing these platform-specific nuances, you can ensure accessibility practices are fully integrated from design to deployment.
Building Accessibility into the Product Lifecycle
Manual testing is essential, but it should be paired with automated audits to maintain accessibility standards. Use tools like XCTest (performAccessibilityAudit()) for iOS and Espresso (AccessibilityChecks.enable()) for Android to catch structural issues, such as a missing contentDescription, during every build. Automated tools are great for spotting regressions, but they typically catch only 20% to 40% of WCAG violations. This makes manual testing an indispensable part of the process.
Schedule quarterly manual reviews with VoiceOver and TalkBack, or conduct them after major UI updates. Designers can also play a crucial role by annotating wireframes with the exact reading order, defining semantic roles, and specifying what screen readers should announce - ideally before the handoff to developers.
Accessibility isn’t a one-and-done task. According to Forrester Research, every $1 invested in accessibility yields a $100 return. By embedding screen reader testing into every stage of the product lifecycle - from design annotations to CI/CD integration to post-launch documentation - you move beyond one-time audits and create products that are genuinely inclusive.
At DeveloperUX, we believe accessibility should be a fundamental part of the development process. Incorporating these practices ensures accessibility becomes an integral component of delivering outstanding user experiences.
Conclusion
Testing mobile screen reader compatibility is a continuous effort that directly impacts your app's usability. With accessibility issues being so common and a significant number of users depending on screen readers, there's still a noticeable gap between good intentions and effective implementation.
The main message is straightforward: combine automated scanning, manual testing with VoiceOver and TalkBack on real devices, and regular user validation to achieve meaningful results. Automated tools alone can't catch every WCAG violation, so a layered approach is essential. This not only improves usability but also reduces the risk of legal and compliance issues.
As Senior QA Lead Yuri Kan aptly states:
"Mobile accessibility is not a feature you add at the end - it's a quality attribute you test throughout. Every sprint without accessibility testing creates debt that's exponentially harder to fix later."
It's also critical to account for platform differences and potential legal exposure. iOS and Android each use distinct APIs, gestures, and behaviors for accessibility, meaning findings on one platform don't necessarily apply to the other. Overlooking this can lead to compliance risks, especially as ADA digital accessibility lawsuits continue to rise in the U.S., impacting businesses across industries. Testing on both platforms isn't just a technical necessity - it’s a business priority.
At DeveloperUX, accessibility isn't an afterthought; it's a fundamental quality standard. By integrating accessibility from the design phase all the way through deployment, you can ensure your app works for everyone.
FAQs
Which user flows should I test first with screen readers?
When testing mobile apps with screen readers, prioritize key user flows such as login and checkout processes. Pay special attention to elements like modals, error messages, empty states, and permission prompts, as these often impact accessibility. Go through each screen to confirm that the focus order makes sense and that screen reader announcements are clear and helpful. Always test on real devices to accurately reflect platform-specific behavior and nuances.
How do I know if my app’s labels and focus order are correct?
Take the time to manually navigate your app using TalkBack (for Android) or VoiceOver (for iOS). This helps ensure your app is accessible and user-friendly for individuals relying on screen readers. Here’s what to focus on:
- Check Labels: Make sure every interactive element announces a clear and specific purpose. Avoid generic terms like "button" or "link" that don’t provide enough context.
- Test Focus Order: Swipe through the screen to confirm the focus moves logically, typically from top to bottom and left to right. Verify that no elements are skipped or cause the user to get stuck in a loop.
For iOS, you can also use the Voice Control’s "Show Names" command to visually confirm that labels are displayed correctly. This step adds an extra layer of assurance that your app is intuitive and accessible.
What’s the best way to test dynamic updates like errors and toasts?
To ensure dynamic updates like errors and toast messages are accessible, make sure they are announced to users without shifting focus. It's important to manually test on both iOS and Android, as screen readers process updates differently.
- iOS: Implement announcements using
UIAccessibility.post(notification: .announcement, argument: "Error: Please enter a valid email"). - Android: Use
android:accessibilityLiveRegion="polite"or callview.announceForAccessibility("Error: Please enter a valid email")to notify users.